{article.name}
Abbey Rent-All
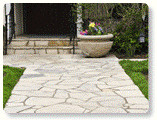
Install a Flagstone Walkway
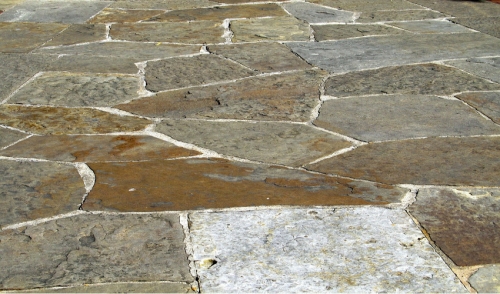
A flagstone walkway is a simple and functional way to beautify your outdoor space and provide a useable path to your garage, garden, shed or other points of interest in your lawn and garden. It is durable, requires little maintenance, and blends well with almost any type of outdoor décor. Head to your local True Value hardware store for the tools, products, and expert advice you need to properly install a flagstone walkway. Then follow the steps below to get started. ________________________________________
Step 1. Plan it Out
Plan out your walkway by deciding shape, direction and endpoints. Do you want a formal or informal appearance? Will your walkway be a straight path to the garage, or does it need to curve from your back door around the house or around a group of trees or a flower garden?
Helpful Tip:
• Using flagstones with unique shapes creates an informal impression, as does placing stones randomly with different distances between each. A more formal walkway will have stones set close together with uniform space between each one, as well as squared corners and more traditionally shaped stones.
Measure out the walkway’s dimensions with a tape measure. It is up to you to decide how long or wide you want your walkway. A good rule of thumb for a path width is at least 3'.
Using garden hoses, lay out the shape of your walkway with this measured width.. Be sure that your path’s width remains consistent. Measure it again and again as you lay down the hoses. If your path will be straight, you can also use wooden stakes and garden twine to mark the path. If you use stakes, drive them into the ground in intervals, using a hammer and attach the twine to each stake at the base. Keep in mind that stakes and twine won’t work for a curved path. When using hoses as a guide, lay them down in the desired shape of the path and then spray landscaping paint to mark the path’s outer perimeter. Spray along the outside edge of each hose. Let the paint dry and then pick up the hoses and put them away.
Once you’ve bought your stones and have them on site, lay down a few to make a rough layout and to make sure it will look the way you envisioned. Remember that flagstones are not uniform in shape and size and don’t need to fit a set pattern; however, they should work within the dimensions of your marked path. Some stones may need to be cut or shaped when you lay them down (see Step 3). Pick the test stones back up and set them aside.
Step 2. Prepare the Site
Next you will be digging out the sod and soil between the paint boundaries. If you choose to use the top layer of sod later, dig it up and set it aside in a cool place. Keep it watered. The average thickness of a piece of flagstone is about 3", so you will need to dig into the soil to a depth of 5". Use a straight-bladed shovel to cut into the soil along the lines you made with the landscaping paint at this depth. Once you’ve done this along the entire length of your pathway on both sides, switch to a pointed-blade shovel to dig out all of the soil to a 5" depth.
Safety Alert!
• Check to make sure that there are no utility lines running through the area in which you’ll be digging. While you won’t be digging deep, it’s always best to know what is underground in your work area.
Ensure that the ground inside your new trench is as flat and level as possible. Tamp down the soil with a tamper. Once the soil is flat and compacted, add a layer of landscaping fabric to the excavated area as a weed barrier.
Helpful Tip:
• When laying landscaping fabric, overlap different sections of fabric, when necessary. Be sure to overlap by at least 4" to 5" for optimal coverage.
Spread about 2'' of fine sand evenly on top of the landscaping fabric so that it covers the entire walkway area. Level the sand by smoothing it with the edge of a length of 2x4. Tamp the sand down over the entire foundation surface with a tamper, taking care to maintain the slope of all surfaces. This will leave you with 3" of space to fit the thickness of your flagstones. In the end, you want the top of the stones to be level or almost level with the surrounding surface.
Step 3. Lay Stones
Begin at either end of the walkway site and start placing flagstones on top of the compacted sand. Try to use the largest stones at first and lay them in the middle of the path. Test out the placement of these stones by walking on them. You want to be sure that they will work with an adult’s normal gait. You don’t want them too far apart so that it feels awkward to walk along your path. Make required adjustments and then begin adding the other stones at one end of the walkway. Position them around the larger stones in the middle to your liking, being sure that the gaps between each stone are around 1" or 2". Tamp the stones down with a rubber mallet. Ensure that the stones don’t wobble or otherwise move. Adjust the position of each flagstone as necessary by adding or removing sand from around them or underneath them. Lay a level across the surface of the stones to check for any excessive unevenness. Make them as level as possible. Fill gaps between the larger stones with smaller stones or pieces of stones.
You may need to cut some stones. If cutting is required to fit the curve of the walkway, or to make a stone otherwise fit elsewhere, draw a cut line on the stone with a pencil or chalk. Tap a chisel along the cut line with a small sledgehammer, making a series of cuts. Prop the flagstone with your 2x4, so the cut line hangs over the edge. Place the chisel against the cutline and strike it with the sledgehammer, breaking the flagstone along the line. To shape the stone, place it on top of another stone and chip away at the edges using the chisel blade.
Safety Alert!

• Wear safety goggles and gloves when cutting stones. Cutting can turn tiny chips of stone into projectiles that can cause serious injury.
Helpful Tip:
• Place a large piece of plywood (large enough to fit across the width of the walkway and to walk on) down at one end of the path and walk on it to further tamp down the stones. Pick up the plywood and repeat the process along the path until you get to the other end.
Step 4. Fill in the Gaps
Filling in the gaps between stones can be done a couple of ways. The first is dry laying the stones, a process where you fill in the gaps between stones with sand. The second is to apply mortar in between, like you would when grouting between tiles.
To dry lay, fill in gaps between the stones by tossing a layer of sand over the entire walkway and then sweep over it with a push broom to push the sand into the spaces between stones. Continue this until you’ve removed all excess sand from the top of the stones. Next, dampen the pathway with a light mist from a garden hose to compress it. Let it dry, and then, if need be, add more sand using the same process.
Dry laying is helpful in climates where fluctuations in weather, from hot to cold, might crack mortar easily. Dry laying is also convenient because replacing stones or removing the walkway later on is much easier. A drawback is that the sand can be washed away over time, so it requires that you reapply sand from time to time.
You can also apply mortar in between your stones for an even more permanent walkway. Mix cement mortar with water, as directed by the manufacturer. Fill a thick plastic bag with the mortar and tie it closed. Punch a small hole in the bottom of the bag with a pencil or a similarly sized sharp object and then squeeze the mortar into the spaces between the stones. Fill each space up to the top of the stones, scraping away any excess mortar that gets on the top of the stones with a trowel. Remember to remove excess mortar that may have splattered on the stones as soon as you see it so it doesn’t set where you don’t want it. After you’ve applied mortar in this way along the entire length of the walkway, allow it to dry for at least a day or two before using it or proceeding with the next step, sealing the walkway.
Step 5. Seal the Walkway (Optional)
If you’ve used mortar to grout your walkway, it is recommended that you apply a sealant to the walkway to protect it from the elements and to ensure its structural integrity. Choose a quality stone sealant. Pour the sealant into a paint tray and then use a roller to apply a thin layer of the sealant over the entire surface of the walkway. Let this application dry as recommended by the manufacturer. Apply a second layer and let it dry. You want the layers of sealant to be applied thinly for a smooth finish. Add another layer, if needed. Let the sealant dry for at least 24 hours before using the walkway.
Congratulations! You’re done. For the rest of your lawn and garden projects, visit your local True Value hardware store for the tools, products and expert advice you need to start right.
Comments